

In the ‘Subhash Palekar Natural Farming’ (SPNF) technique, ‘Humus’ (fertile soil formed after the decomposition of natural matter) is of immense importance. Here is everything you need to know about humus and why it is the secret to a thriving garden.
Contents
- 1. The challenge of sourcing soil in urban areas
- 2. Fertile soil through natural decomposition
- 3. Quality gardening materials are easily found in the city
- 4. Setting up your garden beds for home-grown vegetables
- 5. The layering process and the application of Jeevamrut
- 6. The vital role of Jeevamrut in soil fertility
- 7. Maintaining nutrient levels by replenishing organic matter
- 8. Key advantages of Humus
- 9. Join the Home Garden Campaign
- 10. Personal Experiences: Divine Grace in Gardening
1. The challenge of sourcing soil in urban areas
While plants depend on soil for both structural stability and essential nutrients, sourcing quality growing compost remains a significant challenge for urban gardeners. In a city environment, topsoil is not only scarce but when available its fertility is often unreliable. Furthermore, because most urban cultivation takes place on balconies or roof terraces, the sheer weight of traditional soil makes it labour intensive to transport upstairs and can place an unwanted structural burden on the building itself.
2. Fertile soil through natural decomposition
Humus is the dark, crumbly, and fertile material created when organic matter breaks down naturally. It is formed when dry leaves, grass, vegetable scraps, and crop remains decompose along with the remains of earthworms and insects. This process is driven by the work of millions of tiny microorganisms.
Think of Humus as a ‘natural kitchen’ that provides all the essential nutrients a plant needs. To create high-quality Humus, three simple steps are required:
- Mulching: Covering the soil with a layer of dry leaves or organic waste.
- Jeevamrut: Adding a liquid microbial culture to bring the soil to life.
- Intercropping: Planting pulses or legumes alongside your main crops.
In natural farming, these three steps ensure that fertile soil is created exactly where it is needed, right at the plant roots. It is important to remember that this process only happens when organic matter rots in place; it cannot be copied in a compost bin, a pit, or a factory.
3. Quality gardening materials are easily found in the city
Humus is a goldmine of nutrients for your plants. In urban housing societies, you can easily find the materials you need right on your doorstep. In housing estates, dry leaves from large trees are often available in abundance.
During the summer, you can salvage the dried grass often found in mango crates or packaging. Kitchen waste and coconut husks are also excellent materials for creating high-quality Humus.
4. Setting up your garden beds for home-grown vegetables
Select a location that receives a minimum of 3-4 hours of direct sunlight daily. As a general rule, increased exposure of the sun leads to better yields. You may choose to use pots or construct rectangular beds using bricks.
- Width: Maintain a width of approximately 2 feet to ensure all areas are easily accessible.
- Height: A height of 4 inches, roughly the width of a single brick, is sufficient. This ensures the structural load on the terrace remains minimal.
- Surface Protection: As the Subhash Palekar Natural Farming method requires very little watering of plants, plastic lining is not essential. However, it may be used as a precautionary measure to prevent dampness on the roof.
5. The layering process and the application of Jeevamrut
Begin by filling your pots or brick beds with dry organic matter, such as coconut husks and fallen leaves, ensuring it is firmly compressed. While optional, a thin covering of soil will accelerate the decomposition process. You may also incorporate a 1-inch layer of kitchen green waste; however, exceeding this depth may result in unpleasant odours.
Jeevamrut, made from cow dung, contains the bacteria needed to turn this waste into soil. Dilute the Jeevamrut with ten parts water and apply it weekly to stimulate rapid transformation into Humus. It is vital to maintain moisture by lightly watering the pots every morning and evening, ensuring the material remains damp without becoming waterlogged. (In the absence of Jeevamrut, plain water or soap-free rinse water from the kitchen may be used as a substitute).
6. The vital role of Jeevamrut in soil fertility
Jeevamrut is a ‘starter culture’ of bacteria that helps plants absorb nutrients from the soil. Desi cow dung is naturally rich in millions of these beneficial bacteria. Subhash Palekar developed this formulation to multiply these bacteria manifold. Not only does it accelerate the decomposition of organic matter, but it also prevents unpleasant odours. As the cornerstone of SPNF, regular application is highly recommended.
7. Maintaining nutrient levels by replenishing organic matter
As the garden waste starts to rot, it will shrink and leave more room in your pot or bed by the second week. It is essential to continue layering new waste and applying Jeevamrut during this time. Within 20 to 30 days, the material will have transformed into high-quality Humus.
A clear indicator that your garden bed has matured is the spontaneous germination of seeds from your kitchen waste, such as tomatoes or chillies. Once this occurs, the bed is ready for cultivation. You may then plant various household staples, including pulses like mung beans (moong) or cowpea, as well as ginger, sprouted potatoes, garlic cloves, chillies, and mint stalks.
8. Key advantages of Humus
Nutrient-Rich: It provides everything your plants need to grow eliminating the need for synthetic fertilisers.
Healthier Plants: Plants grown in Humus are stronger and have a natural immunity, so they are less likely to get diseases.
Water Retention: Its ability to hold moisture effectively reduces the frequency watering your plants often.
Lightweight: It is much lighter than regular garden soil, making it perfect for balconies and roof terraces.
9. Join the Home Garden Campaign
This gardening method is straightforward enough for everyone to try. By dedicating a mere 15–20 minutes a day, you can successfully grow your own vegetables at home. While the initial stages of decomposition require a degree of patience, once your soil is ready, you can enjoy a steady supply of fresh, home-grown produce. It is a rewarding way to bring nature into your home with just a bit of daily care through consistency and well planned cultivation.
10. Personal Experiences: Divine Grace in Gardening
“For the past 18 months, we have been growing our own vegetables on our terrace as a way to be more self-sufficient during difficult times. This journey has taught us so much about nature and brought us a great deal of happiness.”

A. Abundant Colocasia (Taro) from just a few roots
We planted 4–5 tubers (Arvi/Alu) on the terrace. Throughout the monsoons, we were able to pick fresh leaves for cooking multiple times. Following the plants’ natural dormancy in October, we dug up the roots and discovered 1.3 kg of healthy tubers. They needed almost no looking after!

These tubers are very nutritious and tasty. Like the leaves, the tubers can be a bit itchy, so it is best to add a little tamarind while cooking them. You can boil them, or use them to make a delicious curry or mash, just like potatoes. The best time to plant them is around May, just before the monsoons begins.
B. Half a kilo of Turmeric from a single accidental tuber
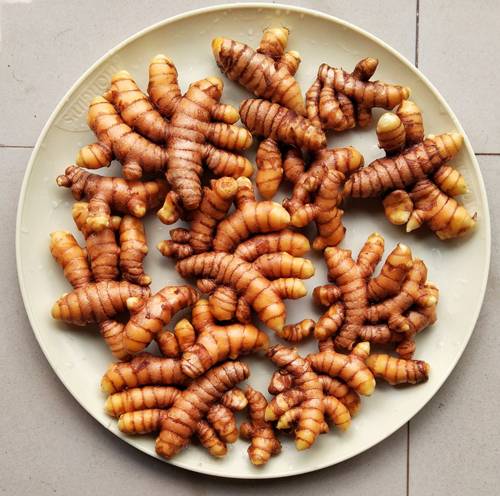
A single turmeric tuber was left accidentally in a pile of soil in a corner. It grew on its own during the monsoons without any care from us. By November, upon uprooting the plant, we harvested half a kilogram of fresh, high-quality turmeric. – Smt. Raghavi Mayuresh Konekar, Dhavali, Ponda, Goa (7.12.2021)
 How to cultivate vital medicinal plants at home ? Part – 2
 How to cultivate vital medicinal plants at home ? Part – 1
 Firefighting training essentials: Civic readiness for an uncertain future
 A seasonal guide to traditional home gardening
 Natural farming: The sustainable alternative (Part 4)
 Natural farming: The sustainable alternative (Part 3)